PyGemのインストールメモ
概要
PyGemはメッシュモーフィングのライブラリで1400万格子まで対応するらしい。以下の記事をみて面白そうだと思ったのでインストール方法だけメモ。
qiita.com
Linux環境の構築をサボっているので今回はColabにインストールしたけれど、普通の人は自分のLinux環境に入れればいいと思う。
はじめに
Colabに行き「ファイル-Python3の新しいノートブック」を選択。あとは以下のコードを入力してShift+Enterで実行していけばいい。前の処理が終わるのを待つ必要はない。
依存ライブラリのインストール
!pip install numpy scipy matplotlib vtk numpy-stl sphinx nose
Anacondaのインストール
%%bash
wget -c https://repo.continuum.io/archive/Anaconda3-5.1.0-Linux-x86_64.sh
bash ./Anaconda3-5.1.0-Linux-x86_64.sh -b -f -p /usr/local
Anacondaのアップデート
!conda update -y -n base conda -c defaults
OCCのインストール
!conda install -y -c conda-forge -c dlr-sc -c pythonocc -c oce pythonocc-core==0.18.1 python=3.6
PyGemのインストール
%%bash
wget https://github.com/mathLab/PyGeM/archive/v1.1.tar.gz
tar -zxvf v1.1.tar.gz
cd PyGeM-1.1
2to3 -w ./
python setup.py install
Tutorial1の実行
PyGemがインスト-ルできたので、STLファイルをFFDで変形するサンプルを実行する。
%matplotlib inline
import sys
sys.path.append('/usr/local/lib/python3.6/site-packages/')
sys.path.append('/usr/local/lib/python3.6/site-packages/pygem-1.1-py3.6.egg/')
from pygem import FFDParameters, FFD, StlHandler

params = FFDParameters()
params.read_parameters(filename='./PyGeM-1.1/tests/test_datasets/parameters_test_ffd_sphere.prm')

stl_handler = StlHandler()
mesh_points = stl_handler.parse('./PyGeM-1.1/tests/test_datasets/test_sphere.stl')
fig = stl_handler.plot(plot_file='./PyGeM-1.1/tests/test_datasets/test_sphere.stl')

free_form = FFD(params, mesh_points)
free_form.perform()
new_mesh_points = free_form.modified_mesh_points
stl_handler.write(new_mesh_points, 'test_sphere_mod.stl')
fig = stl_handler.plot(plot_file='test_sphere_mod.stl')
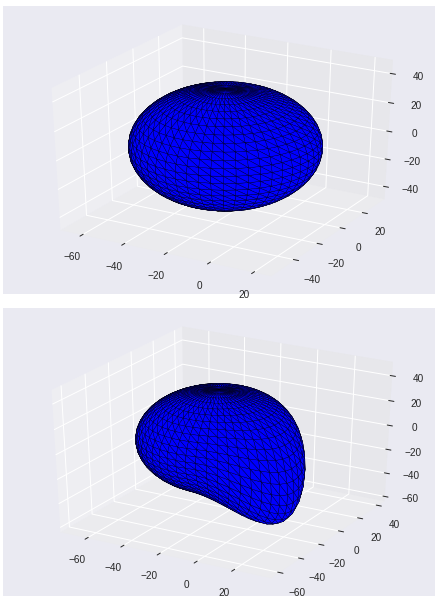
以下のように球体の変形ができている(上が元のSTL、下が変形後のSTL)

おわりに
PyGeM-1.1/pygem/params/の中に変形手法毎のファイルがありそれぞれのread_parametersクラスにどんなパラメータがあるか書いてある。OpenFOAMでの使い方はこの記事が分かりやすかった。ただし、昔は指定していたけれど現在は内部で計算するため@propertyをつけて読取専用としたプロパティがあるので注意。